Related posts Widget for Blogger With Thumbnails
Today Author is going to share an amazing customizable Related Posts widget for Blogger.
Adding a Blogger Widget to a Blogger blog is not a big deal, it is simple and easily customizable. This is a responsive and stylish Related posts Widget for Blogger With Thumbnails.
The Related Posts widget is used to display the most relevant content OR post to the current article, A visitor may already seek or want to read the that article as well. This ultimately will decrease the bounce rate and improve your ranking.
For your ease; it is customized and restyled by us. so you don’t need to do anything. Just add that related post widget to your Blogger Blog. It will look good with any Blogger Template because it has some inherent properties, but if you still want to update this you are welcome to customize it.
This Will Done, In just 3 Steps
Step 1: Add CSS
Copy the following CSS style code and Paste this in the Add CSS section.
Before the </head> Tag
If you want to add these styles in Head tag then add it between the <style> Here </style>
/* Related Posts Widget */ .post-related { display: inline-block; background: #fff; padding: 10px; width:100%;  margin-top: -38px; }
.post-box .heading  {  margin-bottom: 21px;  text-align: center; margin-top: 10px; position: relative; }
.post-box h4 { font-size: 46px !important; }
.post-box .heading:after  {  content: “” ;  position: absolute;  top: 100%; left: 50%;  margin-left: -11px; width: 21px;  height: 1px; margin-top: 2px; background: #b565a7; }
@media screen and (max-width: 600px) {
.post-box h4  {   font-size:28px !important;   }
}
.item-related {     width: 30.6%;     display: block;     float: left;     margin-right: 10px;     height: 100%;     padding-left: 10px; }
@media screen and (max-width: 600px) {
.item-related {  width:unset !important; padding-left:unset !important; height:unset !important; } }
.item-related:last-child { margin: 0!important; }
.item-related .link { display: block; margin: -1px; margin-bottom: 0; }
.item-related img  { margin-left: 0px !important;     display: block;     opacity: 1;     width: 100%;     height: 100%;     object-fit: cover;     box-shadow: none !important;
}
@media screen and (max-width: 600px) {
	.item-related img{ height:100% !important; }
}
.item-related h3  {    line-height: 20px;     margin-top: 8px;     height:111px !important; }
.item-related h3 a { color: black !important;     font-size: 18px !important;     font-family: sans-serif !important; }  img.noops-smly  {  padding: 0 !important;  margin-top: -2px !important; width: 19px; display: inline; }
@media (max-width: 520px) .item-related  {  width: 100%!important;  }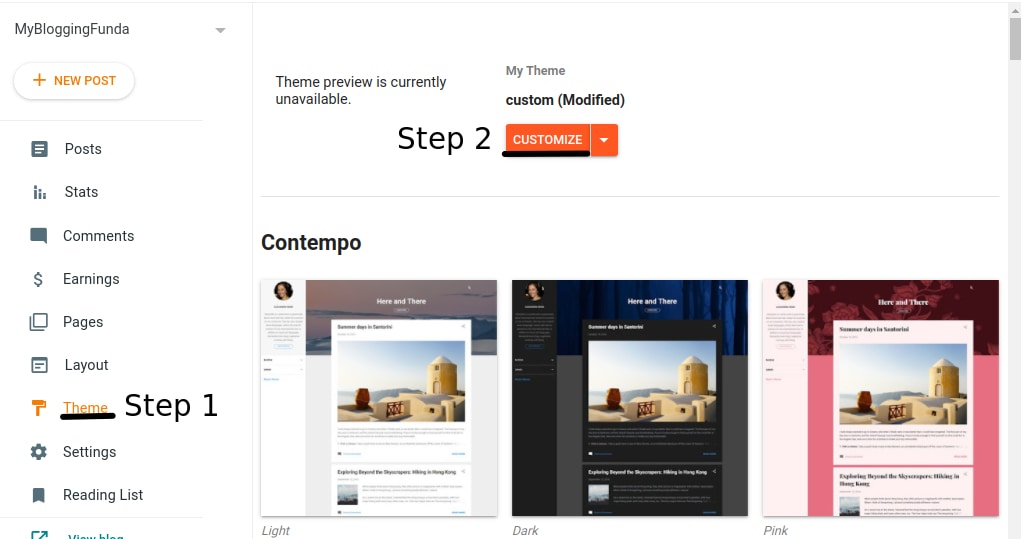
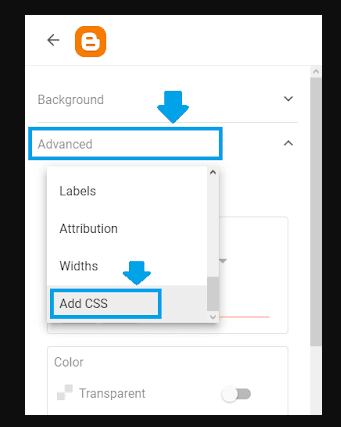
Paste the CSS code. Click Save.
Step 2: Add Bootstrap cdn
Now add this cdn in the head section of your theme.
Follow the steps below.
<link href=”//netdna.bootstrapcdn.com/font-awesome/4.7.0/css/font-awesome.css” rel=”stylesheet”/>Click Theme.
Click the “Downward arrow” beside CUSTOMIZE button.

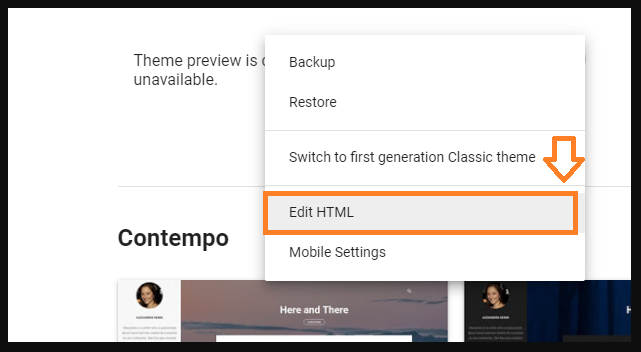
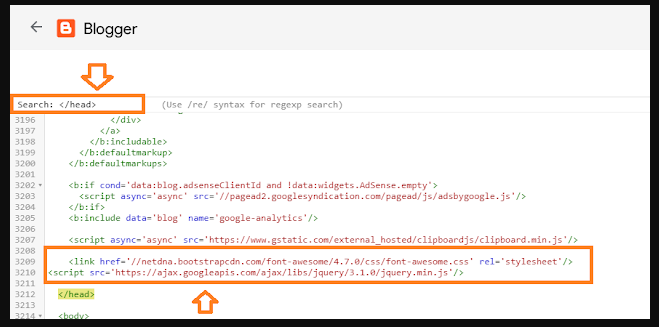
- Now press “CTRL + F” to open the theme’s search bar and type >/head< and press Enter. Search bar will appear at top-left corner of your theme.
Now Paste the librarie just above the >/head< tag.
Step 3: Add HTML/Javascript
Now the final step is to add the HTML/Javascript in your theme.
Now all you need to get #JavaScript Here and copy.
Copy the HTML/Javascript code and follow the steps below to insert into your blogger template
<b:if cond='data:blog.pageType == "item"'>
  <div class='post-bottom'>
            <div class='post-footer'>
              <!-- Footer bylines -->
              <b:include name='footerBylines'/>
            </div>
      <!--   <b:include cond='data:view.isSingleItem and data:widget.type == "Blog"' data='{ shareButtonClass: "post-share-buttons-bottom", overridden: true }' name='maybeAddShareButtons'/> -->
         <b:include cond='data:view.isMultipleItems or data:widget.type == "PopularPosts"' data='post' name='postJumpLink'/>
          </div>
<script id='related-posts' type='text/javascript'> /*<![CDATA[*/ var relatedTitles = new Array(); var relatedTitlesNum = 0; var relatedUrls = new Array(); var thumburl = new Array(); function related_results_labels_thumbs(json) { for (var i = 0; i < json.feed.entry.length; i++) { var entry = json.feed.entry[i]; relatedTitles[relatedTitlesNum] = entry.title.$t; try {thumburl[relatedTitlesNum]=entry.media$thumbnail.url;} catch (error){ s=entry.content.$t;a=s.indexOf("<img");b=s.indexOf("src=\"",a);c=s.indexOf("\"",b+5);d=s.substr(b+5,c-b-5); if((a!=-1)&&(b!=-1)&&(c!=-1)&&(d!="")) {thumburl[relatedTitlesNum]=d;} else {if(typeof(defaultnoimage) !== 'undefined') thumburl[relatedTitlesNum]=defaultnoimage; else thumburl[relatedTitlesNum]="https://blogger.googleusercontent.com/img/b/R29vZ2xl/AVvXsEgtp3pK5sUWXpjU9BN2jTs9SzpoDQso1c56KRD0LvbhgNSYuCT-oguwjpB1cRAXB2gMjWGhStwXbBRBp8OPFsRHg00RA0UfTvc02Msxd8azZPjoIu-juMxyZhIFpXjhRvnC457tpCn3Ap4/s1600/no_pic_available.jpg";} } if(relatedTitles[relatedTitlesNum].length>100) relatedTitles[relatedTitlesNum]=relatedTitles[relatedTitlesNum].substring(0, 100)+"..."; for (var k = 0; k < entry.link.length; k++) { if (entry.link[k].rel == 'alternate') { relatedUrls[relatedTitlesNum] = entry.link[k].href; relatedTitlesNum++; } } } } function removeRelatedDuplicates_thumbs() { var tmp = new Array(0); var tmp2 = new Array(0); var tmp3 = new Array(0); for(var i = 0; i < relatedUrls.length; i++) { if(!contains_thumbs(tmp, relatedUrls[i])) { tmp.length += 1; tmp[tmp.length - 1] = relatedUrls[i]; tmp2.length += 1; tmp3.length += 1; tmp2[tmp2.length - 1] = relatedTitles[i]; tmp3[tmp3.length - 1] = thumburl[i]; } } relatedTitles = tmp2; relatedUrls = tmp; thumburl=tmp3; } function contains_thumbs(a, e) { for(var j = 0; j < a.length; j++) if (a[j]==e) return true; return false; } function printRelatedLabels_thumbs(current) { for(var i = 0; i < relatedUrls.length; i++) { if((relatedUrls[i]==current)||(!relatedTitles[i])) { relatedUrls.splice(i,1); relatedTitles.splice(i,1); thumburl.splice(i,1); i--; } } var r = Math.floor((relatedTitles.length - 1) * Math.random()); var i = 0; while (i < relatedTitles.length && i < 20 && i<maxresults) { tmb = thumburl[r].replace('s72-c/','s300-c/'); document.write('<div class="item-related"><a href="' + relatedUrls[r] + '" class="link"><img width="150" height="100" src="'+tmb+'"/></a><h3><a href="' + relatedUrls[r] + '">'+relatedTitles[r]+'</a></h3></div>');i++; if (r < relatedTitles.length - 1) { r++; } else { r = 0; } } relatedUrls.splice(0,relatedUrls.length); thumburl.splice(0,thumburl.length); relatedTitles.splice(0,relatedTitles.length); } function removeHtmlTag(strx, chop) { var s = strx.split("<"); for (var i = 0; i < s.length; i++) { if (s[i].indexOf(">") != -1) { s[i] = s[i].substring(s[i].indexOf(">") + 1, s[i].length) } } s = s.join(""); s = s.substring(0, chop - 1); return s } /*]]>*/ </script>
                  <div class='post-related'>
                    <div class='post-box'>
                      <h4 class='heading common-heading'> <i aria-hidden='true' class='fa fa-th-list'/> Related Posts</h4>
                    </div>
                    <b:loop values='data:post.labels' var='label'>
                     <script expr:src='"/feeds/posts/default/-/" + data:label.name + "?alt=json-in-script&callback=related_results_labels_thumbs&max-results=6"' type='text/javascript'/>
                    </b:loop>
                    <script type='text/javascript'>
                      var defaultnoimage="https://blogger.googleusercontent.com/img/b/R29vZ2xl/AVvXsEgjpFLtlVP2G6ZPObzwvOl5z_GC3Ob5mHh4W8O3R5Jxn2LtX8tiEi54gIU2Zb9ROfT2Wd4L0lSTpRu3zLaSI6t2jtKE4amNJkdky91ywsrwpzkw-dxCXj2P4rUcWTW58hYJrYQZfl9RR1U/s400/noimage.png";
                      var maxresults=6; // Number Of Posts
                      removeRelatedDuplicates_thumbs();
                     printRelatedLabels_thumbs("<data:post.url/>");
                    </script>
                  </div>
</b:if>
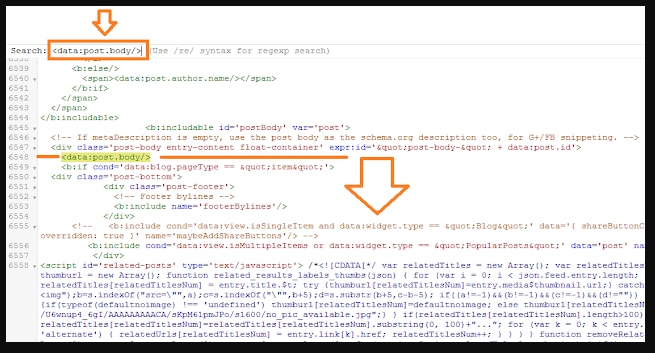
Again press CTRL + F, type <data:post.body/> and press Enter.
Now Pate the HTML/Javascript code under the line <data:post.body/> as we have shown here.
Here the widget code starts from the line <b:if cond=’data:blog.pageType == "item"’>
Now let's set the max number of related posts that you want to show.
In this setting we have set 8 posts. You can change it here. Var maxresults=Here
Now Save your Theme.
Note: If your Blogger is monetized with AdSense it might not allow you to save template after the changes in your theme. If you find this error read our tutorial:

0 Comments